Week of May 22—Pacing a Picture Book
Tuesday, May 24—It’s All About the Dummy, Dummy
Why, oh why, oh why must I learn the same lesson over and over again? I often finish a draft, revise it a few times, and take it for critique. As I sit at the critique meeting (or read from on-line responses), I think: “Hmmmmmm . . . there’s no page turn there . . . Oh, that doesn’t flow well . . . That sounded awkward . . . Oops! I should have caught that.” I seem to always forget: It’s All About the Dummy, Dummy!
To test out a picture book manuscript’s flow and pacing, you need to take the manuscript to the dummy stage. During a critique session an editor once told me, “It’s a nice story. Now you have to make it into a picture book manuscript.” Yikes! The first step in that process is the picture book dummy. Writers use many approaches to complete their dummies. Illustrators go even further in the process that they call storyboarding. Illustrators use storyboarding to make sure words and images mesh together to tell the story. Writers use dummies to make sure the story, itself, is paced and flows.
Some approaches writers use for creating their dummies include:
1. The Slash Method. Joyce Sweeney taught me this approach . . . draw a slash on our manuscript each time a scene changes. Number the scenes. Now you know the number of scenes needing illustrations. Most 32-page picture books need 16-24 scenes.
2. The Poster Method. At an SCBWI—Florida conference, author Laurie Friedman said she divides a sheet of poster board into 32 equal squares. She then numbers the squares to represent the pages of a book. Since most picture books start around page 5, Laurie begins to cut and paste her text into the squares on her poster to create a dummy of the book.
3. The Thumbnail Layout Method. My friend and fellow critique group member, Heather Lambie, developed a one-page thumbnail sheet where she could note what part of the text falls on each page.
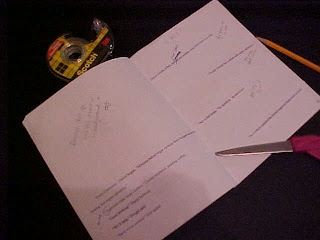
4. Dummied-up Book Method. I use a combination of the above approaches and make a dummy book where I can tape my manuscript.
The supplies are simple: eight sheets of paper (I prefer legal size), stapler, pencil, scissors, and tape.
Steps to making a Dummied-up Book:
1. Stack the pages together and fold them in half. Staple along the fold. Number the pages from 1 to 32.
2. Use the slash method mentioned above to determine the scenes in your manuscript.
3. Cut and tape the scenes on the pages. Begin on page 5 (the first four pages are usually reserved for front matter in a picture book).
4. Think through the illustrations that will be on each page.
5. Now the hard work begins. Read through your “book” and evaluate the pacing and flow. Does the pacing encourage page turns? Is the story evenly spread from beginning to end? Is each scene illustratable? Make notes on the manuscript for revisions.
NOTE: I often go through several versions of a Dummied-up Book before I get to the final stage of the manuscript.
During a consultation at SCBWI, LA, Diane Muldrow, senior editor with Golden Books/Random House, gave me the following notes. I think you’ll find Diane’s words on pacing and flow helpful.
The visuals are not just the illustrator’s responsibility. When it comes to a picture book, the writer will have a better chance of getting published if he/she has thought cinematically . . . take your story and think about the format. Do you see it as a jacketed hardcover? These are usually 40 pages; page out your text accordingly, and write art notes for each page—this will force you to think cinematically, and to think about the flow of the story. Page it out for flow. This is where the writing really starts to happen: Flow is very important; turning the page to see what happens next is a big part of the picture book experience. A lot of thought must go into where you text ends on one page and what starts on the next, and what scene you want the reader to see on each page or spread, and how that scene moves the plot along. Think of the scene, and place the corresponding text there. Make sure the first line of your text matches what the reader is seeing.
After you do this you’ll have not a story, but a picture book manuscript, and you’ll see how much text is on each page, whether the book runs long or short, etc.
Thanks, Diane, for those wise words!
It’s Your Turn!
1. Using one of your manuscripts, make a Dummied-up Book today! Then check your pacing and flow. Tomorrow we’ll begin to discuss ways to improve pacing in our manuscripts.


2 comments:
I am strugling with a story, unsure what to leave and what to wave. Pouring it all into a dummy is most helpful to me. I just started but already get the feel of what's working and what's not... Thanks a milion for this post Rob.
Yifat, that's great news! I can't wait to see your creation on YBR!
Post a Comment